Showing posts with label life of Jesus. Show all posts

Monday, March 23, 2020

Jesus Blesses Little Children Video Lesson

Since we've all moved to online church platforms, I've been inspired to create weekly video lessons for our kids to watch at home.  Here's the first lesson.  Stay tuned for more to come! 


Click on the links below to see my original blog posts of this lesson, where you'll find songs, activities, crafts, coloring sheets and more for you to do with your children at home.  You are welcome to share this resource with others!

I pray you and your loved ones are safe and well.  I am grateful to live in a time when even though we have to stay physically apart, we have ways to stay connected, encourage one another, and proclaim the love of Jesus.  I leave you with Psalm 46:10 "Be still and know that I am God.  I will be exalted among the nations, I will be exalted in the earth!"

Saturday, January 16, 2016

Fishermen Follow Jesus

Last week we learned to repent, and turn from our sin.  This week we are moving forward, following Jesus! If you have been following the lessons here for a while, you've probably started to notice certain recurring themes.  Following Jesus is one of those themes.

For a preschooler, following Jesus means simple obedience.  (Actually it is as simple as that for us too, we just make it more complicated.)  Children who learn to obey their parents and their teachers, will have a much easier time learning to obey God as they grow into their own personal relationship with Him.  In these young formative years, we are tilling the soil, and laying the groundwork of faith in their little hearts.  One of the critical pieces of the foundation is obedience.

There is a clear element of soul-winning and evangelism in this story, and that it is typically the context in which this story is used.  Jesus calls the fishermen to leave their nets, follow Him, and become fishers of men. However, before Peter, Andrew, James and John could become fishers of men, they had to act in obedience.  They obeyed the first time when Jesus told them to let down their nets, after they had been fishing all night and caught nothing.  As I teach this lesson, I make a really big deal of the fact that Jesus did an amazing miracle for then when they obeyed Him!  The fishermen obeyed again when Jesus told them to leave their nets and follow Him.

These are the moments in the story that I highlight for my preschoolers.  Obedience and the blessing that follows, are truths that they can grasp and live out in their own life today, as they learn to follow Jesus! Now let's get into the lesson, shall we?!


Bible Truth: Jesus teaches me to follow Him.
Bible Story: Jesus calls four fishermen to follow Him.
Bible Study: Matthew 4:18-22; Mark 1:16-20; Luke 5:1-11

teach


bring it to life


Songs and visuals are the dynamic duo of any effective lesson for young children.  Any time I can combine these two elements, I know I have a winning lesson!  I gathered up some toys and such to bring this story to life.  Improvise with whatever you have on hand to help illustrate this story.  I used:
  • a small kiddie pool filled with water
  • a toy boat
  • disciple figurines
  • a laundry bag
  • a Jesus visual

Peter, Andrew, James and John were fishermen.  There job was to catch fish with big nets.

One night, they were out fishing all night, but they didn't catch even one fish.

Jesus came into Peter's boat and told him to let his net down into the deep water one more time.
(My Jesus visual is WAY out of proportion, haha!)

Peter and his friends obeyed Jesus, and their net was so full of fish that it almost sank the boat!
Jesus told the fishermen to leave their boat, nets and fish to come follow Him, and become fishers of men.
That means that they would help other people follow Jesus too!

disciple dozen


I discovered this visual aid, via Pinterest, using an egg carton to introduce Jesus' twelve disciples.  I don't use the song accompanying this visual, because my focus for this lesson is following Jesus, rather than teaching three and four year olds the names of all the disciples.  The egg carton visual is a unique way to package and present the disciples.  It helps the kids quantify the number twelve in their minds, and they understand who I am speaking of when we talk about the disciples in the coming weeks.

sing


Peter, James and John in a Sailboat/Fishers of Men is the duo part of this lesson! After telling the story, I like to review it with this song.  I love the way Veggie Tales combines these two songs into a medley on their "25 Favorite Sunday School Songs" album.  As we listen to the song, and sing along, I reenact the story with the visuals.

play


follow the leader


A simple game to play with this lesson is "Follow the Leader."  Say to the children, "When we follow Jesus, we learn to do what Jesus does, just like His disciples.  Let's practice follow Jesus by playing 'Follow the Leader.'"  Invite the children to follow you in a line around the room as you hop, "fly", tip-toe, etc. You could even set up a little obstacle course for them to follow!

Jesus says


"Jesus Says" is played just like "Simon Says,"  I suggest that when playing this game with young children, don't try to trick them by doing the action yourself even when you don't say, "Jesus says."  This only confuses and frustrates them.  Depending on the age and maturity of the children in your class, you may also not want to have sit down and be "out" if they do the action when "Jesus didn't say."  At this age, the appeal of games is the action and participation rather than the competition.  This is intended to be a fun and enjoyable activity for them!

craft


net full of fish


For this craftivity you will need:

  • this activity sheet
  • bright colored paper
  • craft sticks
  • burlap ribbon (Found in the floral section of craft stores.  I found mine for 50% off at Hobby Lobby.)
  • scissors
  • glue
  • crayons
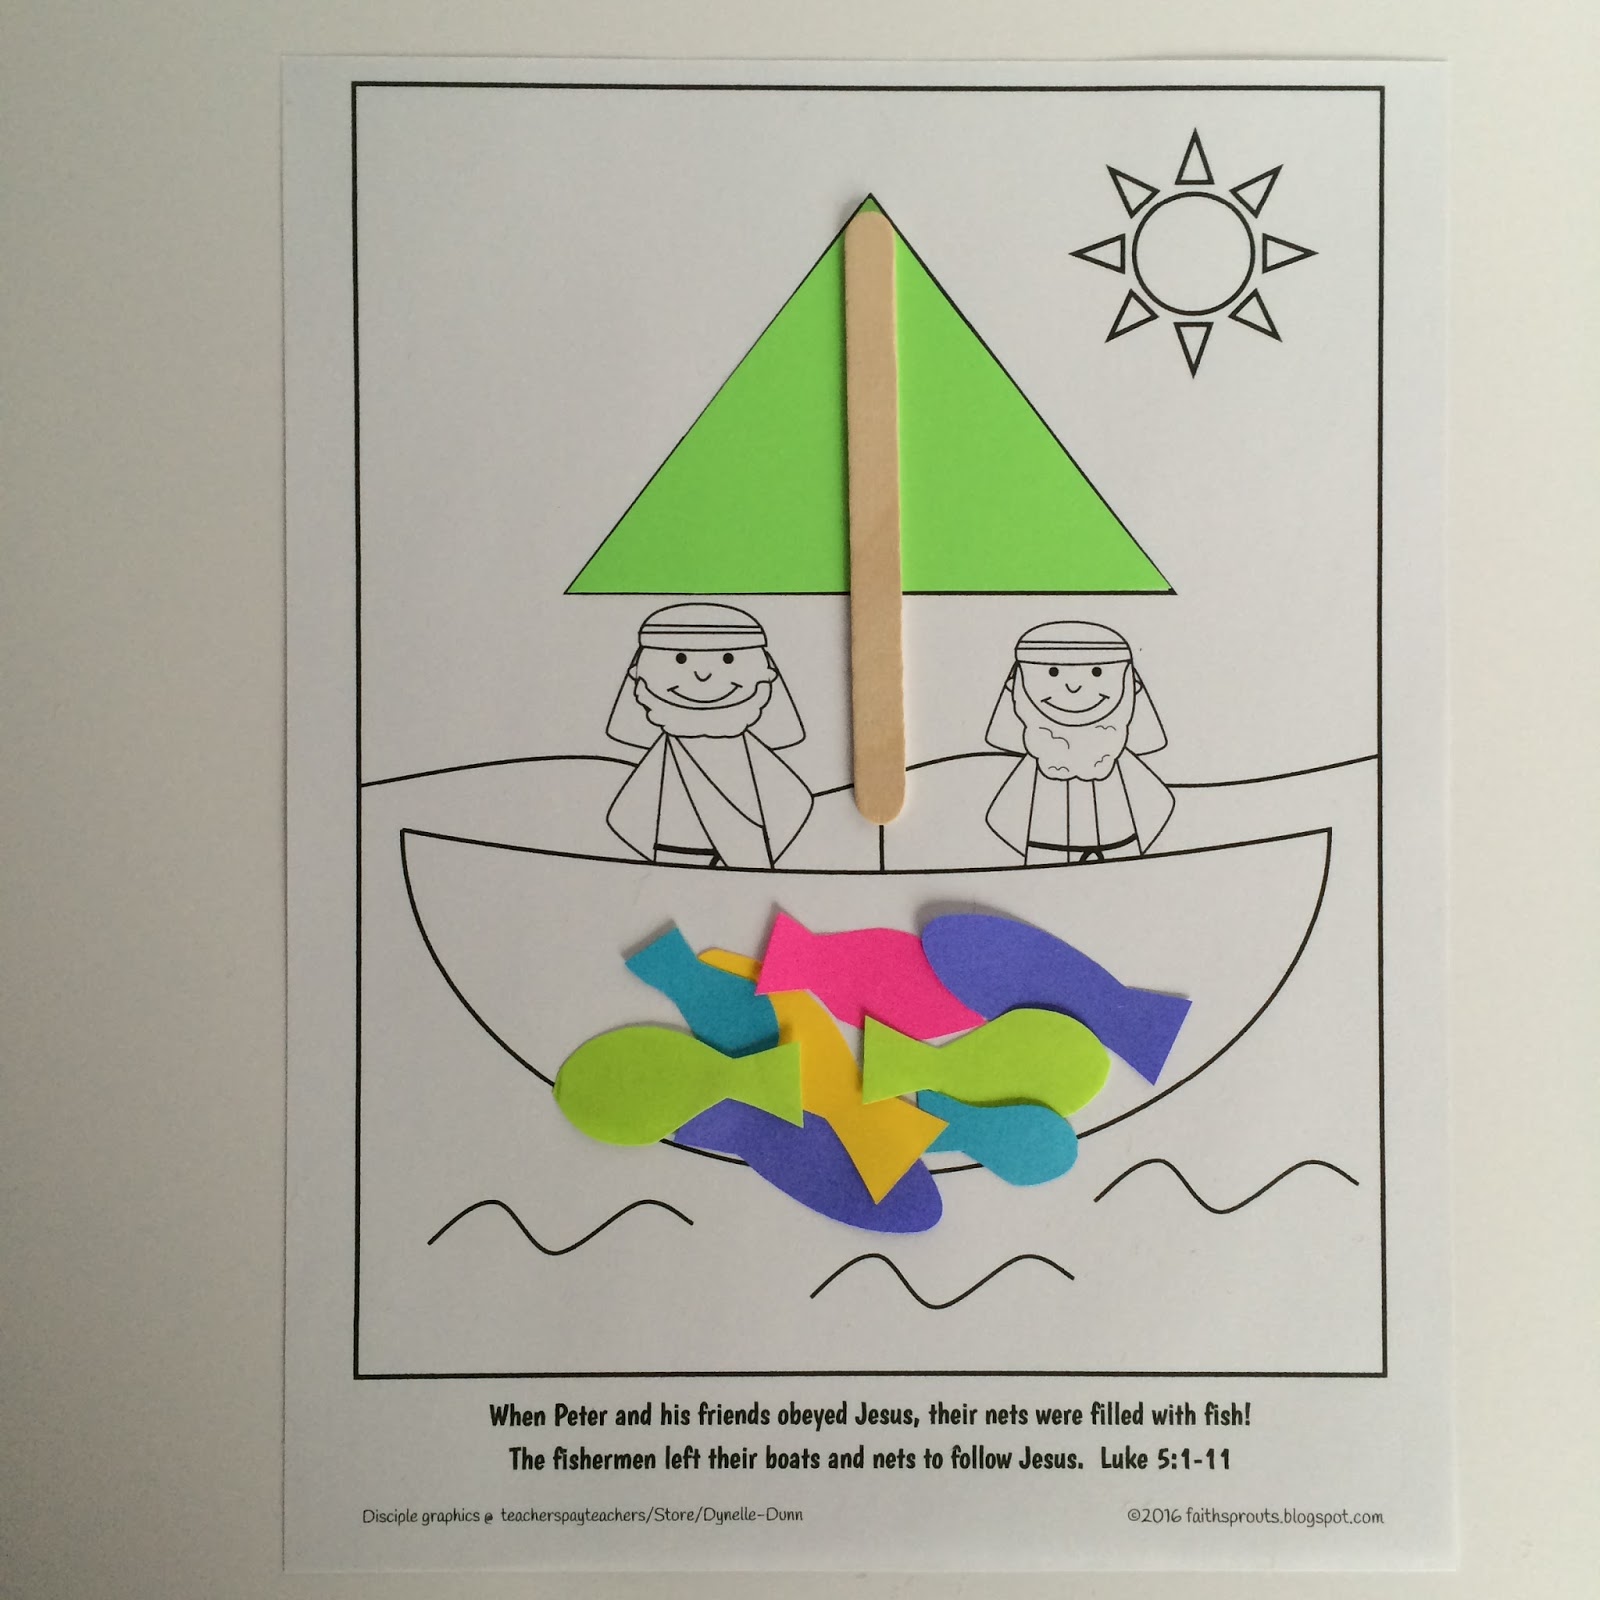
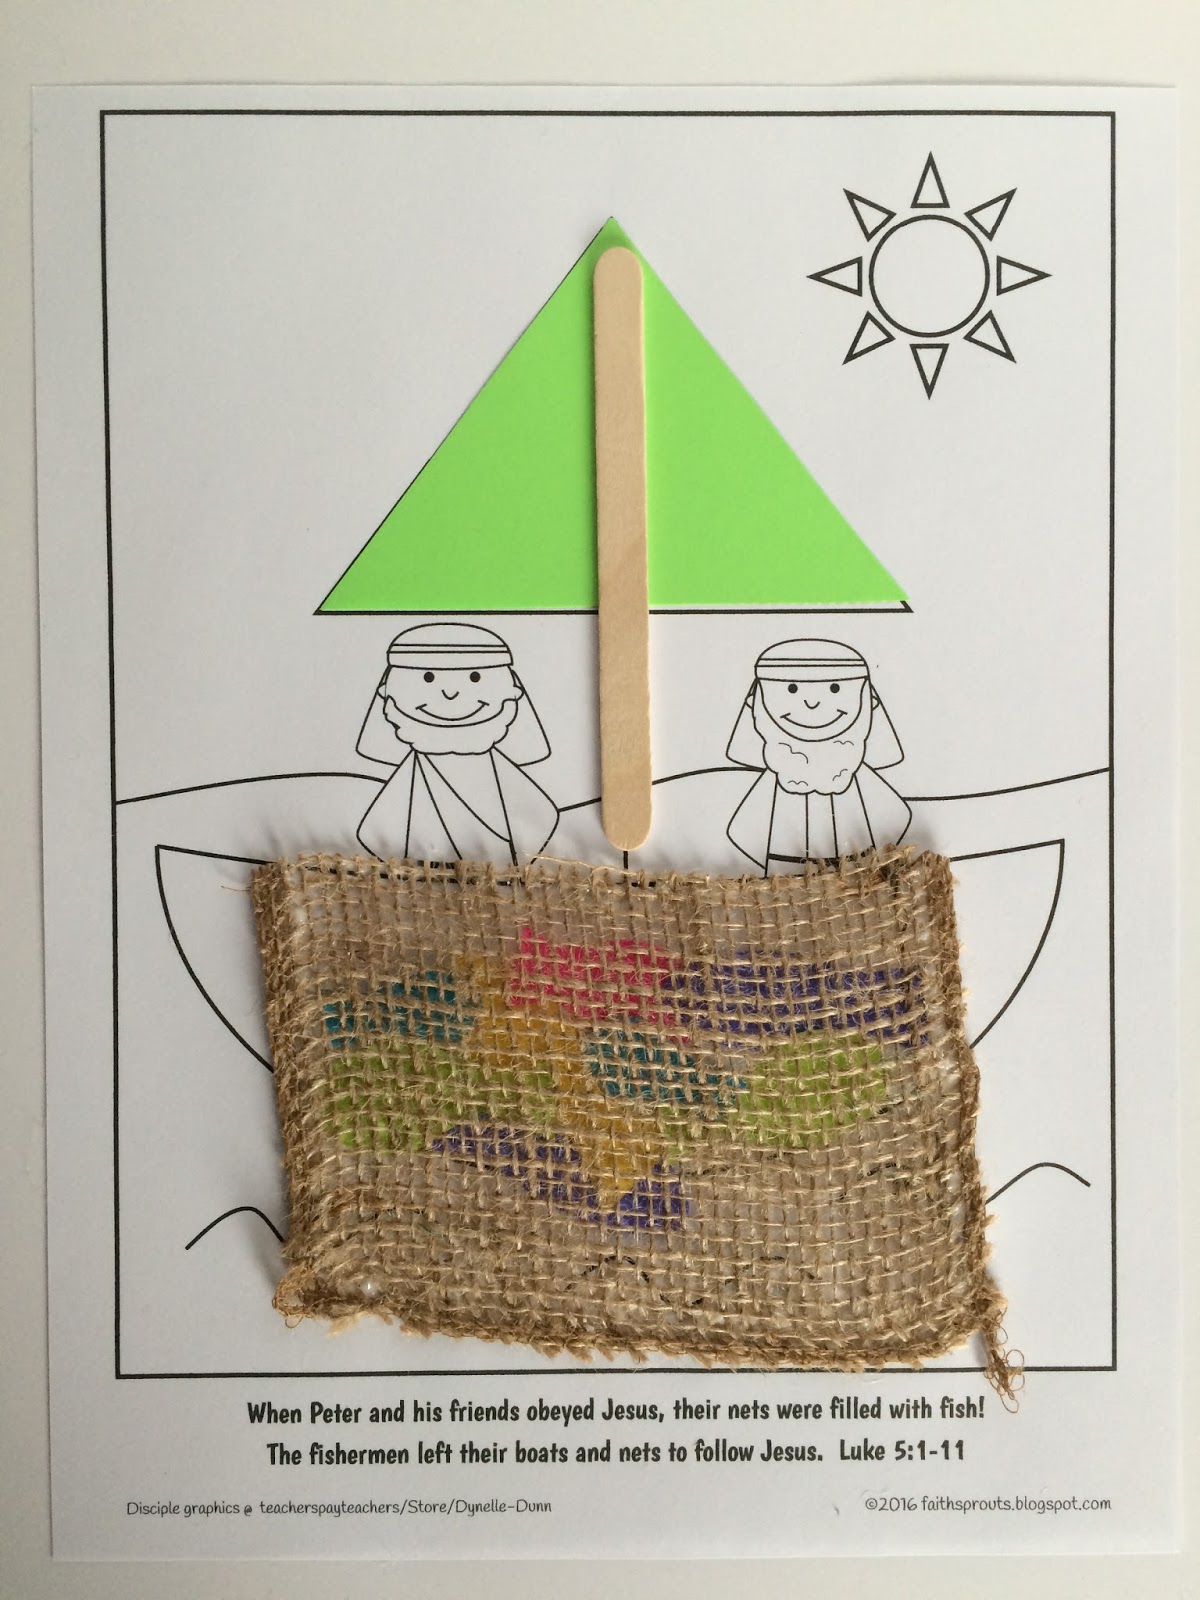
To prepare, print out this activity sheet.  Use the triangle patterns to cut out the sail from bright colored paper.  Cut out several fish shapes for each child, and cut the burlap ribbon to the preferred size.


In class, provide crayons for the children to color the activity sheet.  Help them glue a colorful sail and a craft stick as a mast to the page.  Give them fish to place onto the page, but don't worry about gluing these down. 


 Help them apply glue around the burlap ribbon, and attach it to the page with the fish inside.


coloring page


Here is a simple coloring page to which the children could easily add fish stickers, fish cut outs, or gold fish crackers.

footprint mural


Trace the children's feet, cut them out, and provides supplies for them to paint and/or decorate them. Put the decorated feet up on a wall in your classroom with the heading, "We Are Following Jesus!"

Saturday, November 21, 2015

The Ten Lepers

We begin this unit with a story of a man who had a thankful heart so that our preschoolers can see thankfulness played out in action.

Bible Truth: Jesus loves a thankful heart.
Bible Story: Jesus healed ten lepers, but only one said, "Thank You."
Bible Study: Luke 17:11-19

sing


As you are singing for worship, tell the children that when we sing to Jesus we are saying, "Thank You" to Him.  Tell that today we are going to hear a story about a man who said, "Thank you" to Jesus.


teach


In addition to reading this story from a children's Bible storybook, here's a captivating visual to help you illustrate it.  I used a pair of bath gloves, but this will work with any gloves.  Cut out twenty little circles, draw happy faces on ten, and sad faces on the other ten.  Hot-glue the sad faces to the back side of the gloves, and the happy faces to the palm side.   Attach a Band-aid to each finger on the sad side of the glove. You will also need a little red heart.  I attached a "hook" piece of Velcro to the heart.  Since the Velcro hooks to the bath glove, the heart can easily be placed on and removed from the glove.  Wear the gloves as you tell the story! 


The Bible tells us a story about ten men who were very, very sick.  Let's count the men.  Wiggle each finger as you count.  They had a disease called leprosy.  Can you say leprosy?  That means they had owies all over their bodies.  They wore Band-Aids everywhere to cover their owies.  They were so sick, they couldn't go home to their families, and they had to stay away from people.  If they touched anyone, the other person would get sick too!  They went to lots of doctors, but the doctors couldn't make them better.  One day they saw Jesus walking down the road, and they cried out to Him.  Move the gloves to either side of your mouth as you raise your voice to "call out".  "Jesus, have mercy on us!  Heal us Jesus!"  Do you know what Jesus did for them?  He healed them!  Close your hands into fists.  Turn your hands and open them to show the happy side.


Wow!  Jesus did a miracle!  He answered their prayer and he healed them!  They had no more owies. Now they could go home and give their families big hugs and kisses!  Move your hands as though they are running away.  But one man stopped.  Stop your hands.  Close your fingers except one pointer finger. He went back to Jesus, bowed down, and said, "Thank You Jesus!  Thank You for healing me and taking away my leprosy!"  Bend your finger as if to bow.  Jesus said, "I healed ten men.  Why did only one come back?  Where are the other nine?"  Then Jesus blessed the man who remembered to say, "Thank You," because he had a thankful heart, and Jesus loves a thankful heart.  Add the heart to your pointer finger.


Open your hands to show the ten healed men, and only one with a thankful heart.  Do you want to be like the nine men who forgot to say, "Thank You," or do you want to have a thankful heart?  Yes, I want to have a thankful heart too.  We can say, "Thank You" to Jesus for all the beautiful things that He created. We can thank Him for dying on the cross for us, giving us a clean heart, and giving us a home in Heaven with Him forever.  Lead the children in a prayer of thanksgiving.

practice


For the rest of the service, as you are doing a craft, and/or eating a snack, help the children practice saying, "Please and thank you."  When they remember to say, "Thank you," praise them for having a thankful heart like the man in today's story.  Remind them that Jesus loves a thankful heart.

read


If you have a book about manners, and saying, "Please and thank you," it would be good supplement to this lesson if you have extra time at the end.


craft


one thankful heart


For this craftivity you will need:

  • this activity page
  • Band-aids
  • red paper
  • scissors
  • crayons
  • glue
To prepare, make double-sided copies of the activity page, and cut out a red heart for each child.  

In class, provide crayons for coloring.  Give each child two Band-aids to stick on to the sick leper side of the activity page, and one red heart to add to one finger on the healed leper side of the activity page.


thank You Jesus


Print this activity page for your kids to color, and follow the coloring directions on the page.  I found the original coloring page of Jesus here.  It would also be fun to add a sticker to the man who is colored yellow, to help distinguish the one from other nine, especially for younger children who may not yet be ready to follow the coloring directions.  As the children are coloring, count the men symbol figures with them.  Count how many were healed, how many said, "Thank You," and how many forgot.


Saturday, May 2, 2015

A Cheerful Giver

Preschoolers have yet to learn the actual value of money, but they have already developed a pretty good sense of money's intrinsic value.  Many years ago when I was a teenage helper in Faith Roots (our church's preschool class),  Miss Cheryon was teaching the children about giving in the offering. Holding one of the offering containers, she explained that all the money put in this container goes to little boys and girls that don't know about Jesus yet.  With dollar signs in his eyes, one little boy raised his hand and said, "I don't know about Jesus yet."  Very clever little fella!  It was a priceless moment that gave us all a good laugh.

Young children can relate to the widow in this week's lesson because they usually do not have a very significant amount of money, but they can learn that Jesus is pleased when they give of whatever they do have.

Bible Truth: Jesus teaches me to be a cheerful giver.
Bible Story: The woman who gave two coins was a cheerful giver.
Bible Study: Mark 12:41-44: II Corinthians 9:7


teach


the sound of giving


I like to dramatize this story with two coin purses or wallets of some sort. To show the rich people who were giving their offering, I deposit a small handful of coins into an offering bowl or plate.  A metal one is nice, because the louder the noise the better.  I show the children that these people still had lots more money in their wallet.  From the other small coin purse, I pull two little coins, to show the widow's offering.  She had nothing else left.  She gave all that she had.


offering preschool style


In my class, we have two offering cans: one for church offering, and the other for world outreach. They are made out of plastic coffee containers with openings cut in the lid.  A picture of our church building is on one, and the other has a globe graphic.  The children give their offerings when they sign in, since it usually doesn't work well for them to hold on to them for too long.  When a child does bring an offering I encourage them to say, "Thank You Jesus," and then I'll pray, "Lord bless __________'s offering."  It's just a simple way of correlating offering to worship.  We use the money deposited in the church container to purchase things for the classroom.  I save the world outreach offering all year and add it to Children's Church's annual world evangelism conference offering.  The children choose in which container to put their offering, and it truly does go for the purpose that they choose.  We're not making big bucks here, but the children are learning to give with a cheerful heart, and honor God with their money.


As I explain how God uses our offering, I choose pictures from our church's evangelism publication "Gospel Pioneer" to show the children how God uses our world outreach money to start new church's and teach more children the good news about Jesus. You can view the online edition of the publication here.  I then point out that we come to church to learn the good news about Jesus, and explain that the money they put in the church offering is used to buy things like crayons, glue and books that help us teach them about Jesus.

big money


Years ago, as a little girl, an uncle gave me these huge, poster-sized money visuals.  At the time it was a bit of an odd gift, but I held onto them, and now they make a great object lesson.  The kids think they are just the coolest thing, and I talk about how God can take the little bit that we give, and use it to do bigger things.  I've seen packages of jumbo paper money at the dollar store that you could even send home with your students as a fun reminder of this week's lesson.


sing


the offering song


I wrote this song to help teach the kiddos about tithing.  I will show the children ten coins or dollar bills, and say, "If I have $10, then Jesus says that the first one belongs to Him."  I don't really go into the math of one-tenth.  The concept is there, but I emphasize that when God blesses you with money, the right thing to do is to obey and honor Him by first giving some of your money in the offering. Click here to download the lyrics as shown below.


craft


coloring sheet


Here is a coloring page of the widow giving her offering.  Provide plastic gold coins, or circle paper cut outs for the children to glue onto the page.


coin rubbing


This is a unique take on a coloring activity for this lesson.  When kids do it, it's more about the experience and process of discovery for them, rather than a beautiful finished masterpiece.  You will need:
  • this activity page
  • smiley stickers
  • crayons
  • coins
Give each child a coin.  Show them how to place the coin under their paper, and rub the crayon on their paper over the coin.  Continue moving the coin to different positions under the paper to fill the paper with coin rubbings.  Suggest turning the coin over to rub the other side, and trading coins with other children to add interest and variation.


my little money pouch


Children can use this little money pouch to keep their offering in to bring to church.  You will need:

  • Foamie sheets 
  • scissors
  • stapler
  • Velcro
  • Foamie stickers


I purchased an assorted pack of 50 5.5" x 8.5" Foamie sheets from Walmart for $4.97, and a package of 80 sticky back Velcro rounds $6.77.  I won't use all of either of these items for this craft, so I will be able to add them to our craft collection to use in the future.

To prepare, cut 5.5" x 8.5" Foamie sheets in half.  Staple the sides together.  Be sure to leave a flap at the top to attach the Velcro.  In class, provide Foamie stickers for children to decorate and personalize their money pouches.

*Many of the suggested activities involve the use of coins.  Never leave the children unsupervised with coins, and do not allow children to put coins into their mouths, as coins may become a choking hazard.  These activities are not suggested for children under three years of age.


Monday, April 27, 2015

The Gospel is Good News: Home Ideas

The gospel is the good news about Jesus!  As you talk about sharing the gospel with others this week, you can also introduce your preschooler to simple map and geography concepts.
  • Read stories in your child's Bible about the Apostles Paul and Peter as they spread the good news gospel of Jesus.   Pray together for your pastors and missionaries that you know who preach the gospel.
  • Look at a map or globe together.  Find the city where you live, as well as the places where family, friends and missionaries you know may live.
  • Watch this animated story of Paul's travels as he preaches the gospel.
  • Find opportunities to share the love and good news of Jesus with people you and your little one encounter in your neighborhood, at the park, at the grocery store, etc.

Saturday, April 25, 2015

The Gospel is Good News

Over the last several months we taught our kiddos about the life of Jesus from the cradle to the cross. In this lesson, we review the good news about Jesus, and introduce the word gospel into our preschoolers' vocabulary.  We even sneak in some beginning geography skills!

Bible Truth: Jesus teaches me to share the gospel.
Bible Story: Before Jesus went back to heaven, He told His friends to preach the gospel.
Bible Study: Matthew 28:18-19; Mark 16:15; Acts 1:1-8; Romans 1:16-17

teach


show and TELL


An inflatable globe is a great, preschool-friendly visual.  Both the visual and tactical elements help develop some of a child's first geographical concepts.  Since the children can safely handle the globe, it can also be used in games like the one I describe below.  I picked mine up from Hobby Lobby for under $10.


Holding my Bible open, I explain that before Jesus went back to heaven, He commanded us to go into all the world and preach the gospel.  Then, I hold up the globe as we talk about the world.  I point out where we live, and point out a few other continents or countries, especially those where we have missionaries that we support. I point out that the blue parts are water, and the other colored parts are land where people live. I explain that Jesus wants everyone in the whole world to hear the gospel and know that He loves them.

An echo microphone brings a fun audio element to this lesson.  

I speak into it as I teach the meaning of the word gospel. The gospel is the good news about Jesus!  I hold up a picture or object to illustrate each point of the good news.
  • Jesus came to save us.
  • Jesus died on the cross for our sin.
  • Jesus is alive.
  • Jesus is making a home for us in heaven.
  • Jesus loves you.
Then, I give each child a turn to stand up and use the microphone to say, "Jesus loves you!"  Older children may have more to say about Jesus.  

read


"I've Got a Job To Do" by Dandi Daley Mackall -  Through the daily life of a little girl, the author demonstrates practical ways to share the gospel at school, dance class, the beach, and everywhere we go. The title of the book is a refrain that is repeated in each scenario, as the little girl shares the love of Jesus with everyone around her.

"Every Child Everywhere" by Debby Anderson - I'm a huge fan of Debby Anderson's books. Endearing photography and illustrations of children from many countries, along with the message of God's love for them, help little ones understand that there are children all over the world who need to know the good news about Jesus.


sing


  • Go! from Little Praise Party: Happy Day Everyday is a fun upbeat song about going into all the world to tell the good news.  You could teach the song to the children with simple actions, use it as a puppet song, or use it in the game as I describe below.

  • Jesus Loves the Little Children from Veggie Tales is another great song for this lesson.  I like this version because it includes the lyrics, "Jesus came to save the children..."


play


around the world


This is another scripture pass game, similar to ones I have described before.  Gather the children to sit in a circle.  Play the song, "Go!" from above as they pass around the inflatable globe.  Randomly pause the music. The child holding the globe when the music stops, stands up.  Hold the echo microphone for each of you to speak into as they repeat Mark 16:15 after you, "Go into all the world and preach the gospel." Play the music, and continue passing the globe.


craft


the good news gospel


Children will share the gospel as they talk about each picture on this activity page. You will need:
  • this activity page (globe graphics included)
  • scissors
  • glue sticks
  • crayons
  • optional stickers and craft items
To prepare, print out the activity page and cut out enough globe graphics for each child.

In class, help children glue their globe to the circle on the activity page.  Provide crayons for children to color, You may consider adding various craft items stickers, or cutouts that you have on hand to the graphics.  For example: heart stickers to the heart, foamie crosses to the cross, and/or sequins to the heaven graphic, etc.


gospel megaphone


Here is a simple craft, with a fun way to practice the memory verse.  You will need:
  • colorful paper cups
  • pipe cleaners
  • a razor blade
  • this scripture print out
  • scissors
  • glue
  • stickers

To prepare, use the razor blade to cut out the bottoms of the cups.  Print, and cut out the scripture tags. Use the razor blade or other sharp object to poke holes in the cup, and cut the pipe cleaners in half.

In class, help the children assemble their megaphones.  Insert the ends of the pipe cleaners into the holes you made, and bend the ends inside the cup.  Glue the scripture tags to the megaphones, and provide stickers to decorate.  Practice saying the memory verse using their megaphones.

globe mosaic


This low-prep mosaic craft is a great visual reminder of this lesson, and promotes beginning geography skills as preschoolers create land masses separated by water.   This is an open-ended craft (my favorite!), however I suggest making an example first to demonstrate to the children how to create land masses separated by water like you see on the globe.  You will need:
  • blue paper plates
  • green construction paper
  • this scripture print out
  • glue (see this suggestion for using glue!)
  • smiley stickers
  • hole punch
  • ribbon

To prepare, print and cut out the scripture tags.  You may choose to tear pieces of construction paper ahead of time, or if time allows, give the children strips of green paper to tear in class.

In class, provide glue sticks for the children to glue down their mosaic pieces and their scripture tags.  Add smiley stickers, representing different people all over the world that need to hear the gospel.  Punch a hole at the top of the plate, and add a ribbon to hang.  (Or in my case, the other half of the pipe cleaner that just happened to be sitting on my desk. Ha!)


See this post for more ideas to teach your child at home about sharing the gospel of Jesus!


Monday, April 20, 2015

Jesus Sends the Holy Spirit: Home Ideas

Teaching your little one about the Holy Spirit can be as fun as making a windsock, doing sidewalk art, and eating yummy snacks.  Here are some great springtime activities to do with your child this week that also help introduce them to the concept of the Trinity, and the Holy Spirit as our helper.

  • Read the story of the Day of Pentecost in your child's Bible.  Talk about how Jesus kept His promise to send the Holy Spirit, and gave us a special language to help us talk to God when we pray.  Pray together, and thank Jesus for sending the Holy Spirit.  Ask the Holy Spirit to help them obey, tell the truth, and tell others about Jesus.
  • Look for times when your child is having difficulty doing the right thing, completing a task or overcoming fear.  Pray with your child to ask the Holy Spirit to help them in this situation.
  • Make a windsock.  Let you child decorate an empty toilet paper roll.  Staple long strips of ribbon or streamers to one end of the tube and hang it up outside.  Watch the wind blow the sock.  Discuss the wind: “We can’t see the wind, but we can feel the wind and we can see the wind blowing things.  That’s just like the Holy Spirit. We can’t see Him with our eyes, but we know He is with us.  He will help us obey and follow Jesus.”  (You could also fly a kite and discuss the same concept.)           
  • God has three parts just like a triangle.  Help your child draw triangles with sidewalk chalk.  Then think of other things you can draw with triangles (i.e. house with a triangle roof, ice cream cone, hat, etc.)
  • Hard boil an egg.  Crack it open to discover the three parts of an egg: the shell, the white and the yoke.  It is one egg but it has three parts.  There is one God but he has three parts.  Sprinkle on salt and eat a yummy egg snack!  An apple is another great snack that also has three parts: the peel, flesh and core.


Saturday, April 18, 2015

Jesus Sends the Holy Spirit

What do balloons, pinwheels and triangles all have in common?  They all help us introduce preschoolers to the Holy Spirit!  Simply put, my goal is to teach them that, the Holy Spirit is God, and His job is to help us.

Bible Truth: Jesus sent the Holy Spirit.
Bible Story: Jesus sent the Holy Spirit to be our helper.  God is three in one.
Bible Study: John 14:15-18, 25-28; Acts 1:4-8; I John 5:7


teach


up and away, here to stay


A couple helium balloons provide a great way to visually connect Jesus' ascension, which we taught last week, and Jesus' promise to send the Holy Spirit.  Bring two balloons, and the children outside for this illustration.  Tie one balloon to your wrist, and keep it out of sight behind your back.  Release the other balloon and remind the children how the disciples watched Jesus go up, up, up into the clouds as you watch the balloon's ascent.

© Syaochka | Dreamstime.com - Red Balloon Photo

When the balloon is out of sight, explain that Jesus promised his friends that he would not leave them alone. He promised to send the Holy Spirit to always be with them.  Release the other balloon, tied to your wrist, from your grasp, illustrating that wherever you go, the Holy Spirit is always with you.  Just as the balloon is filled with air, Jesus said that you will know that you are filled with the Holy Spirit because He will give you a special heavenly language to speak.

trinity triangle


I use a triangle to teach the children that there is one God, who has three parts, and three jobs.  To create my visual I used:
  • foamie sheets
  • jumbo craft sticks
  • glue
  • scissors
  • Velcro
Glue three jumbo craft sticks in the shape of a triangle onto a foamie sheet.  Cut out a heart, cross and hand from foamie sheets as shown below.  Attach Velcro to the back of each shape and to the corresponding places on the foamie sheet. 


I start out  counting the three sides, and three corners of the triangle with the children. Then I cover up a side or a corner of the triangle with my hand, and ask, "If I take away this part of the triangle, do I have a whole triangle?  No!  There's a part missing."

I go on to explain that God is like a triangle. He has three parts.  I attach the heart and explain that He is God the Father who loves us and takes care of us.

Then, I attach the cross and explain that He is God the Son, Jesus, who died on the cross for us.

Finally, I attach the hand and explain that He is God the Holy Spirit who is our helper.  I then cover up the hand shape with my hand and ask, "If I take away the Holy Spirit do I have all of God? No! You need all three parts to have all of God."

I go on to ask the same question and make the same statement about God the Father, and God the Son.


sing


  • Three In One - this song accompanies the trinity triangle visual.  Remove the three shapes from the visual used in the lesson, and then add them to the visual at the appropriate times in the song.  Follow the link for the song's tune, lyrics and actions.  Tip: Print and glue the lyrics to the back of the visual for ease of use.

  • Three In One - this is a different song with the same title and same message that would work well for older children.  Follow the link for a music video.

play


trust the guide


The Bible says that the Holy Spirit guides us in all truth (John 16:13).  This game illustrates that point.  Set up furniture or cones in the room as a simple obstacle course.  Choose two children to be a team.  Blindfold one child.  The other child leads their teammate through the course, without bumping into anything.  Just as we can trust our friend to lead us through the course, we can trust the Holy Spirit to guide us in doing what is right.

craft


always with me balloons


Kids are always excited about balloons!  Taking one home will help them remember your lesson, and remind them that the Holy Spirit is always with them.  For this craft you will need:


To prepare, print, cut out and punch a hole in the scripture cards.

In class, trace each child's hand on the back of their scripture card.  Provide crayons or markers for them color and decorate their hands. Attach each card to the string of a helium balloon.  Tie a balloon, with their decorated card, to the wrist of each child.  They will love taking home a balloon!

© Mrspants | Dreamstime.com - Cute Girl With Balloons Photo

three in one


This craft is based on the visual used in the lesson.  In addition to coloring and adding craft sticks to the page, you could also add stickers, or cut outs in the shape of a heart, cross and hand.  Coloring in the numbers and letters on this sheet helps to develop pre-writing skills. The lyrics to the song are also included so children can sing it at home with their parents. You will need:


paper pinwheels


We cannot see the Holy Spirit, but we can feel Him.  We can see that He is helping us, as He gives us the power to overcome sin, and do what is right.  Pinwheels remind us of the Holy Spirit.  We cannot see the air that makes the pinwheel move, but we know the air is there, because we can feel it, and we can see it make the pinwheel spin.  Click here for a pinwheel tutorial.  Prepare and cut the paper before class.  In class, provide markers and stickers for the children to decorate their pinwheels before you assemble them.


See this post for more great ideas for teaching your child about the Holy Spirit at home this week!


Monday, April 13, 2015

A Home in Heaven: Home Ideas

This week's activities are designed to introduce your child to the hope and promise of heaven.  The reality of our heavenly hope was renewed in my own heart as I planned and prepared these lessons.  My prayer is that in the teachable moments you have with your children and students this week, that your heart is also encouraged and uplifted by the promise of our eternal home.

  • Read the story of Jesus ascending into heaven. Pray together and thank Jesus for preparing a home for us where we can live with Him forever. 

  • Jesus said that in His Father's house there are many mansions. Help your child construct their own mansion with recycled boxes and containers. Then let them paint and decorate it. 


  • 'H' is for Heaven. Print the letters 'H' and 'h' in a large font. Show your child how to roll out long thin pieces of play dough and form an upper and a lower case 'H'. Then use the play dough to form things that begin with the letter 'H' such as a horse, hippo, hat, house, heart etc.

Saturday, April 11, 2015

A Home in Heaven

Heaven is a very abstract concept for children to understand.  We don't even fully comprehend it as adults!  However, Jesus does give us some very clear and beautiful descriptions about our hope of eternity with Him.  In this lesson, I try to make heaven as tangible and real as possible.  I also emphasize to my little preschoolers that the best part about heaven is that we will finally be able to really see Jesus and be with Him forever!
 
Bible Truth: I have a forever home in Heaven.
Bible Story: Jesus went back to Heaven to prepare a home for us.
Bible Study: John 14:1-6; Acts 1:9-11; I Thessalonians 4:15-17; Revelation 21:22-27


teach


I like using our flannel graph set to visually show Jesus ascending up into heaven as I tell this story.  Then I use a gold gift bag that I call my "Heaven Bag" to describe the kind of home that the Bible says Jesus is preparing for us.  Below is a list of items that I have in the bag.  I pull each item out one by one, and talk about whether or not we will have and/or need it in heaven.  If it will be in heaven I keep it in the gold bag.  If not, I throw it into a trash bag, which I usually ask one of the children to hold for me.


 Items to represent what will be in heaven include:
  • gold (coins or jewelry)
  • crown
  • jewels
  • small musical instrument (worship)
  • piece of fruit (we will have a feast in heaven)
  • picture of Jesus (the best part about heaven is we will see Jesus!)
Items that will not be in heaven include:
  • band-aids 
  • medicine
  • flashlight
  • tissues (to wipe tears) 
  • black heart (sin) 


sing


Heaven is a Happy Place - I have colored various pictures from coloring books to illustrate each verse of this song.  You could also hold up objects from the lesson above that correspond with each verse of this song.  Follow the link for the tune and lyrics. 
  

craft 


up in a cloud


This craft helps the children remember, and retell the story of Jesus' ascension.  You will need:
  • these print outs (I suggest printing the first page on card stock for stability and ease of operation.)
  • scissors
  • tape
  • yarn
  • hole-punch
  • cotton balls
  • glue
  • crayons
To prepare, cut out the large clouds, and pictures of Jesus for each child.  Punch a hole in the center top and bottom of the activity page, and thread a piece of yarn (approximately 20 inches long) through each hole.  Tie off the ends of the yarn in the back near to the top hole.  Tape Jesus to the piece of yarn.

In class, children can color their page and glue cotton balls the clouds.  Help them put glue on the opposite ends of the large cloud, and attach it to their pages in a way that allows for Jesus to easily be pulled up behind it.  Children pull the string in the back to move Jesus from standing on the ground with His disciples, to ascend up to heaven in a cloud.


'h' is for heaven


This is simple, low prep craft.  Print this activity sheet onto cloud stationery paper.  I purchased mine from Wal-Mart.  Give the children small cotton balls, or pull larger cotton balls apart, to glue onto the letter 'H'.


a beautiful home


Another simple craft is to provide children with craft jewels and sequins to decorate a picture like this. 

See this post for more activities to teach your child about Heaven at home this week!
 

Friday, April 3, 2015

Jesus is Alive!

For Easter, I've created my own Resurrection Eggs to tell the story of Jesus' death and resurrection!  I use six jumbo sized plastic eggs, each filled with a different object, to teach my preschoolers why we celebrate Easter.  Six is a manageable number of eggs to open and reveal, when considering the attention span of young children, and the large objects work well in a larger group setting.  Besides the jumbo size of the eggs are fun and spark their curiosity!

I've seen jumbo eggs at both Michael's and Hobby Lobby.  A set of three is $19.99.  However, all Easter items are 50% off at Hobby Lobby, and with a coupon, you can get them nearly half off at Michael's as well.  You can still teach the same lesson with normal sized plastic eggs. Just fill them with smaller objects like the ones I suggest for the craft.  However you tell the story, have a blessed Easter celebrating the glory of our risen Savior!

UPDATE 2022: It was time for me to purchase new eggs for this lesson.  These are the ones I purchased this time from Amazon.

Bible Truth: Jesus is Alive
Bible Story: Jesus died on the cross, and in three days, rose again!
Bible Study: Matthew 26-28; Mark 14-16; Luke 22-24; John 17-20


teach


resurrection eggs for preschoolers


Here is a pictorial outline of my lesson.  I open one egg at a time, revealing the object, and describing what happened to Jesus.  I also show pictures, such as from a children's Bible, to enhance the visual aspect as I tell the story.


 Soldiers whipped and beat Jesus.


They put a crown of thorns on His head and laughed at Him.


They nailed His hands and feet to a cross, where He hung and died.
All of His blood came out of His body.  He did this so that His blood can wash away our sin.


His friends wrapped His body in a clean cloth.


His body was placed in a tomb.  A big rock covered the tomb, and soldiers guarded it.

After three day, His friends found that the stone was rolled away, and the tomb was empty!
They were filled with joy!  Jesus is not dead.  He is alive!


Description of objects:
  1. Whip - leather lacing wrapped with black Duck tape.
  2. Crown of Thorns - small craft branch held together with hot glue and floral wire.
  3. Nail & Cross - a railroad spike we've had for years (just find the biggest nail that you can!) and a stained wooden cross painted red.
  4. Linen Cloth - small piece of white material
  5. Tomb & Stone - a paper plate, cut in half, stapled together, painted brown, with a crumpled brown paper bag stuffed in the opening.  (This could also be a craft for the kids to make!)
  6. Smiley Face Stickers - individually cut.  In traditional Resurrection Eggs, the last egg is empty, because the tomb was empty.  For young children I've found this to be anti-climatic.  I want the resurrection to be the most exciting part of this story to them.  When I dramatically open this egg, the smiley face stickers fall out like confetti!  The kids clamor to pick them up and we take them to the table to use in our Resurrection Egg craft.


sing


Sing, praise and celebrate.  Jesus is alive!

play


resurrection egg hunt


Children are accustomed to finding Easter eggs filled with candy, which is fine, but in this game they can hunt for eggs that will help them remember what Easter is truly about!


Fill plastic eggs each with an object like the ones in the craft below.  Invite children to close and cover their eyes while you play one of the Easter praise songs above.  Hide the eggs around the room.  When you are ready, stop the music to cue the children that they may uncover their eyes and hunt for eggs.  

When they find an egg, they can grab it and rejoin you in the teaching area.  Let each child open their egg and tell you what part of the story is represented by their object.  If you have pictures to accompany the story, display them, and let the children also point to the picture that corresponds to their object.  Collect the eggs from the children, and hide them again, as long as time allows or as long as the kids are interested.

craft


my own resurrection eggs


Kids will be able to recount the story of Jesus' death and resurrection as they talk about each of the objects in this craft.


You will need:
  • this page printed on card stock
  • leather-like strapping
  • thin black Duck tape
  • grapevine wire (found in the floral section of a craft store)
  • cross stickers
  • gauze
  • small stones
  • smiley face stickers
  • foamie egg stickers (optional)
  • Tacky glue
  • scissors
  • wire cutters
Prepare the whips, crowns of thorns and gauze ahead of time.  In class, help the students attach each object into the correct egg.   I've found that it is easiest to attach the whip to the page by leaving a bit of the tape unwrapped around the leather strapping, so that you can simply tape it down.


Read these ideas to continue celebrating Easter and the resurrection of Jesus at home this week!