Sunday, September 6, 2020

Creation Day 3

Bible Truth: God created land and plants.
Bible Story: God created land to walk on, pretty flowers and trees.  He also gave us plants with fruits and vegetables to eat.
Bible Study: Genesis 1:1, 9-13

Day three of Creation invites little ones to observe, explore, investigate and touch their world.  This all comes quite naturally to young children.  Embrace their God-given curiosity.  See the world through their eyes, and lead them to give praise and thanks to God, the Creator of it all.


teach

Begin your lesson with your Bible open to Genesis 1:1. Use simple actions for the children to follow as they repeat the verse with you.  "In the beginning God created the heavens and the earth."

SAY: On day three of Creation, God told dry land to appear.  Then he told the land to grow trees, plants, flowers, fruits and vegetables.  God created all these things for us to eat and to enjoy. On day three God created land and plants.

 Choose from the visual ideas below to teach different aspects of day three.

  • Hold up landscape pictures, perhaps from a book, calendar, or cards (i.e. vegetation, beach, mountains and/or rock formations).  Ask the children what they see.  Invite children to take turns pointing out one thing that they see in the picture.

  • Collect rocks, pine cones, leaves, pieces of bark, etc. for the children to hold and investigate.  Talk about the colors they see and the textures they feel. You may opt to take the children out an a walk to collect their own nature findings.

  • Bring in a plant, with soil and a watering can.  Talk about how God created plants to grow in soil, dirt that has food that plants need.  Demonstrate watering the plant with the water that God created on day two.  Observe the leaves, stems and/or flowers.

  • Cut open a couple different pieces of fruit and remove the seeds.  Some fruit has lots of little seeds, and some fruit has one big seed.  Talk about how God put seeds inside plants, flowers, fruits and vegetables.  Share pieces of fruit with the class.  (Be sure to check for allergies.)


sing


Sing the first three verses of "God Created".

craft

nature collage


Use the items the children collected on their nature walk.  Provide construction paper and glue to make nature collages.

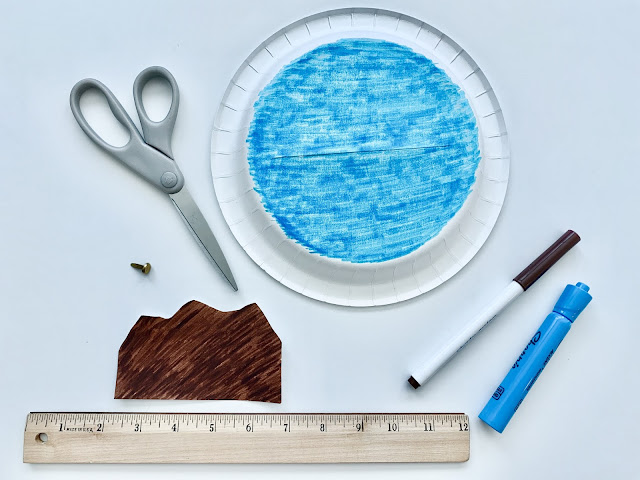
dry ground appears


You will need:
  • white paper plates
  • white card stock
  • this scripture print out
  • razor blade
  • ruler
  • scissors
  • blue markers, paint or crayons
  • brown markers, paint or crayons
  • brads
  • glue


To prepare, use a razor blade and ruler to cut a 5" slit through the middle of each paper plate.  Cut the card stock into mountainous shapes approximately 4.5" x 3".  (Index card would work well for this also!)  Print the scripture print out, and cut out one for each student.  Line up the mountain shape over the paper plate to find the right placement.  Use the tip of the razor blade to poke a hole through the left corner and the paper plate.

In class, provide the children with blue markers, paint or crayons to color the paper plates.  Use blue crayons to color the scripture label blue.  Provide brown markers, paint or crayons to color the mountain shapes.  Place the mountain shape on the back of the paper plate, and fasten the brad through the hole.  Help the children glue on their scripture label to cover the brad.  Show the children how to manipulate the dry land to appear as they say the verse.


day 3 math


This activity page incorporates several beginning math concepts!  Preschoolers can trace the numbers 1, 2 and 3; count the flowers and apples to practice one-to-one correlation; and use fine motor skills to glue seeds or beans to the large three as they become familiar with the shape and orientation of the number.

You will need:


Saturday, July 11, 2020

David the Shepherd Boy

Bible Story: God loved David's heart.
Bible Study: David was a young shepherd boy who loved to sing and worship God.  God sent the Prophet Samuel to anoint David as king of Israel.
Bible Truth: 1 Samuel 16:1-3

teach


sing

Download the MP3 of Step by Step to sing with your little ones.  Over the years I have found this to be the best worship song to sing with preschoolers.  It's worshipful, but not too slow, with simple lyrics right out of Psalms.  The sign language that I demonstrate in the video, is also simple, and invites young children to actively participate.  I can always sense God's presence in the room when we sing this song!

craft

Here are links to a couple different interactive harp crafts for this lesson.


Saturday, July 4, 2020

Happy Birthday America


Birthdays are a big deal to little ones, so celebrating the Fourth of July as America's birthday is a fun way to explain the importance this day!  Our celebrations may be a little bit more low key this year,  but hopefully you can celebrate our nation's freedom as a family, and make some great memories together.  Now, more than ever in our lifetime, we need to pray, and teach our children to pray for our country, our leaders, and our fellow believers around the world. May God bless America!

teach


craft


I rounded up some simple patriotic crafts and coloring sheets that I found on Pinterest.  Visit my board and choose some activities to do with your little ones at home.

sing


In addition to singing Happy Birthday to America, here is an album with some great patriotic songs to introduce to your kids.  Play it as the soundtrack to your day, and they will likely choose a favorite or two to hear on repeat.  If you choose to do a flag craft, you can play You're a Grand Old Flag and have a flag parade in your living room!

Sunday, June 21, 2020

Father's Day

Bible Story: Thank God for my daddy.
Bible Study: God is our Father.  He loves us, protects us and gives us everything we need.  He gives us good fathers to take care of us.
Bible Truth: Exodus 20:12; Matthew 7:7-11; Proverbs 4:1-2; 23:22-24

seeds for thought

Father's Day can be a tricky to navigate with our little ones.  On one hand we want to uphold and honor good fathers, and it is absolutely right to do so.  On the other hand we also want to be very sensitive to children who are growing up with absent fathers.  For these children, Father's Day can be difficult.  My approach is to speak about this reality very gently and indirectly.  In my lesson I say, "Sometimes our dads make mistakes, or they can't be with us."  Every child can identify with this statement on some level.  Then, I point the children to our perfect Heavenly Father.  Every child needs to know that they have a Father in heaven who loves them, cares for them, and gave His only Son so that we can be His children.

teach

visuals to gather:
  • picture of you with your dad
  • picture of your dad doing his job
  • hammer (or any tool)
  • laptop (or any device)
  • wrapped gifts
  • heart shaped gift box
  • baby Jesus figurine (or picture)
  • wooden cross
A picture of you with your dad when you are young is a fun way to introduce your Father's Day lesson.  Kids don't usually think of their teachers as ever being children, so seeing a picture of "little you" is interesting to your little ones, and also helps them connect and identify with you.  In my video lesson I connect the concept of dads working to the idea that God, our perfect Heavenly Father is always working for us and for our good.  In Matthew 7:11 Jesus tells us that our earthly fathers know how to give us good gifts, but God knows how to gives us the best gifts.  The best gift that He has given us is the gift of His only Son Jesus.  Jesus was given to die for us, so that we can be God's children.  Our Heavenly Father loves us, and nothing can separate us from His love.


craft

One of my favorite things to do for Mother's and Father's Day crafts is to write down what children say about their parents.  Their own words are so sweet, memorable and personal!  I provide two wording options for this craft.  The first one is clearly for a child to give to their dad.  The second could be given to their dad, or another significant man in their life.  Choose the best one for each child, depending on their family situation.  You could also just use the second option for all the children, so that there is no difference between them.  

You will need:
In class, allow the children to choose a color of construction paper to glue their page to.  Use the blank space to write down the reason each child says about why they love their dad, or think someone in their life is a good man. Provide any art medium you have, or choose, for the children to color their pictures.  I love these paints because they are so easy, mess free, and vibrant in color!  Encourage the children to sign their own name.  You can write it again for clarity if needed. 

Sunday, March 29, 2020

Jesus Changed Zacchaeus' Heart Video Lesson

I pray you and your little ones are well.  Enjoy this week's video!


Follow the links below to see my original blog posts for this lesson, where  you'll find songs and printouts for a couple crafts and a coloring sheet.


Monday, March 23, 2020

Jesus Blesses Little Children Video Lesson

Since we've all moved to online church platforms, I've been inspired to create weekly video lessons for our kids to watch at home.  Here's the first lesson.  Stay tuned for more to come! 


Click on the links below to see my original blog posts of this lesson, where you'll find songs, activities, crafts, coloring sheets and more for you to do with your children at home.  You are welcome to share this resource with others!

I pray you and your loved ones are safe and well.  I am grateful to live in a time when even though we have to stay physically apart, we have ways to stay connected, encourage one another, and proclaim the love of Jesus.  I leave you with Psalm 46:10 "Be still and know that I am God.  I will be exalted among the nations, I will be exalted in the earth!"

Saturday, February 29, 2020

Jesus Heals a Woman & a Girl

In this passage of Luke's gospel, Jesus is on His way to heal Jairus' daughter, when a desperately sick woman reaches out by faith to touch the hem of His garment, and receives her healing. The intersection of these two women's lives, and their needs, poses some striking differences and similarities. Twelve years is obviously significant for each of them. For twelve years, the woman's life slowly drained from her body. For twelve years the little girl lived a vibrant life, before she was suddenly overcome with sickness, and eventually death.

On this day, at the convergence of twelve years, they both needed a miraculous healing.  When the woman reached out to touch Jesus, the steady flow of blood that drained her of life, stopped in an instant, and she received new life.  When Jesus reached out, taking the little girl by the hand, life-giving blood instantly flowed through her lifeless body, and she opened her eyes to new life.

Both of these stories demonstrate that the life-giving power is released from Jesus to our need at the moment that His life touches ours.  I pray that Jesus touches you, and your precious children as you love them and lead them to Jesus this week.

Bible Truth: Jesus heals me.
Bible Story: Jesus healed a woman who had been sick for a very long time, and raised a little girl back to life.
Bible Study: Luke 8:40-56, 1 Peter 2:24, Psalms 103:1-3


teach


doctor, doctor


A woman who had been very sick for many years went to see many doctors, but none of them could heal her, or make her feel better again.  A first aid kit, with either real supplies, or toys, helps the children to connect their experiences at the doctor, with this woman.  I begin the lesson by bringing out a first aid kit.  I briefly talk about each item, and how doctors use these things to help us.


touching Jesus


As I considered this lesson, I wanted movable visuals that could actually reach out and touch at the very moment of the miracle.  I made extremely simple felt tunics for a few of our dollhouse figurines with movable arms, and belted them with strands of leather lacing.  You could use figurines, dolls, or even stuffed animals, in the same way.  As I read the story from a children's Bible, or narrate with my own words, I manipulate the characters.

The woman who was very,very sick, Jesus and Jairus' daughter

The woman pushed through the crowd, and got close enough to reach out and touch the edge of Jesus' clothing.
As soon as she touched Him, all of the sickness left her body and she was healed!

Jesus told the woman that her faith made her well.  The woman said thank You to Jesus and praised God for healing her!

Jesus took the little girl by the hand and said, "My child, get up!"

The little girl got up, and Jesus told her mom and dad to give her something to eat.

Jesus did a miracle!  Only Jesus can raise somebody from the dead and bring them back to life!  

Thank God for doctors who can give us medicine or a shot when we need it.  They take care of us when we are sick or hurt, and help us to get better, but Jesus is the best doctor of all!  He doesn't need to use medicine or band-aids.  He just has to touch us, and we can be healed!

crowd participation


I'm always looking for ways for the children to participate in my lesson.  This story includes a large crowd of people following Jesus, as well as a large crowd gathered at the home of Jairus.  I give each child their own doll figurine to hold during the story so that they can participate.  They can crowd around Jesus, cry when Jairus' daughter dies, laugh when Jesus says she is only sleeping, and gasp in amazement when she is raised from the dead.


sing


Theses are great songs to sing about God's power and His love for us! 

Bigger Than Big - great song for kids to join in for worship

My God is So Big - one of our favorites


play


touch Jesus relay


This relay game gives kids the chance to let our some energy as they race to touch Jesus, and cheer each other on!  Choose a child to be "Jesus" and have them stand at one end of the room, with their hands down at their sides, palms facing out.  Divide the rest of the children into two teams, and line them up at the opposite end of the room.  At your signal, direct one child from each team to run across the room, touch the hand of "Jesus", shout "Jesus healed me!" and run back to their team.  The next children in each line then runs across the room in the same way until all the children from both teams have run the race.  Continue playing, giving as many children as time allows the opportunity to be "Jesus".


craft


miracle sequence


You will need:
To prepare, cut out a set of pictures as three separate pieces, and the scripture for each child.

In class provide a glue stick, and a piece of construction paper for each child.  After they color their set of pictures, help them glue the scripture and each of the three pictures, onto their piece of construction paper, in the correct order.  As you are discussing the series of events in the story, use sequencing language (beginning, middle and end) to encourage vocabulary development, while you reinforce today's lesson!


*the typo on the page for you to print is corrected*


Thursday, January 2, 2020

2020 Scope & Sequence

Happy New Year!  Click the link below to print your own copy.  I appreciate everyone who took the time to drop me a note of encouragement last year.  I pray that you are all blessed and inspired as you teach your little ones wherever you are!


Tuesday, January 1, 2019

happy new year!

Here's something to celebrate... the 2019 scope and sequence is completed and posted!!  As I reflect on this past year, I am grateful that God has graciously given me this platform to support and bless so many of you in your own places of ministry.  I hear from many of you throughout the year, and each time, I am encouraged and blessed to know that we are partnering together to lead little ones to Jesus. 

As much as we love Jesus and the children we serve, the truth is that at times we feel discouraged.  There are hard days, when the children seemed interested in talking about everything else except the lesson you've prepared.  Or when a child has an accident, so your plans get derailed because you take the time to clean up the child and the mess on the floor.  Or when a child throws a fit at clean-up time, then makes for an escape, so you chase after him, and he kicks you in the process.  (That happened to me just this Sunday!) 

Even on the hard days, remember that beyond our lessons and our plans, we are the hands of feet of Jesus to every child who enters our classrooms each week.  Our Savior takes notice of us, and He promises to reward us, because however small the act of service may seem, we are serving as His disciples, in His name, for His glory.  "And whoever gives one of these little ones even a cup of cold water because he is a disciple, truly, I say to you, he will by no means lose his reward" (Matthew 10:42). 

Be encouraged!  Know that you are not alone.  There are literally thousands of us, serving in our corner of the world, doing a great work in the place that God has planted us.  "And let us not grow weary of doing good, for in due season we will reap, if we do not give up" (Galatians 6:9). I pray that you are refreshed and strengthened for every good work in the year ahead. Blessings to you all!

Friday, February 2, 2018

2018 scope & sequence

Just dropping in to make a little PSA to let you know that my 2018 Scope & Sequence has been posted!  Click the tab above.  May God continue to bless and inspire you all as you teach those who are precious and dear to His heart. 💙

Friday, November 17, 2017

Basket of Blessing

I love Thanksgiving!  I think of it as a pure holiday, in the sense that it is still centered on gathering with those we love around a table of thanks.  It's not as commercialized, and it's not about receiving anything, but rather giving thanks for what we have.  However, gratitude and thanksgiving are virtues that children learn through modelling and practice, which is precisely the goal of this lesson!

teach


A Basket of Blessing makes gratitude a tangible, concrete concept for young children.  I fill a basket with a variety of objects found around my home or classroom, representing things to be thankful for.  I cover the basket with a nice cloth and place it in front of the class for the children to see as we do praise and worship.  They literally beg me to start the lesson because they are so anxious to see what is in the basket!

I pull out each item, and briefly discuss what it is and why I am thankful for it.  If I have the right item to child ratio, I like to hand each item to a child to hold for the duration of the lesson, adding a bit more interest, and motivation for the children to stay engaged, because of course they may only hold an item if they are sitting quietly on the carpet. 😉


Here is what I typically include in my Basket of Blessing.  I'm sure you will have other ideas of your own!
  • family picture - of me with my family when I was a little girl, and of my husband and I now
  • house - small doll house (a Lego house is another suggestion)
  • food - a box of snacks, which I share with children who were sitting "criss-cross applesauce on your bottom" (This gets everyone sitting quietly very quickly, so I make sure to pull it out when I can see that they are starting to get antsy!)
  • clothing - an accessory or article of clothing
  • picture book - representing toys and books
  • car - a toy car or car keys
  • beautiful picture of the desert - since that is our environment here in Tucson
  • small pillow - to represent my bed
  • pets - animal figurines or stuffed animals
  • Bible
  • small wooden cross
  • picture of Jesus in Heaven
  • white (clean) heart - forgiveness of sins
  • picture of our church
As I put each item back into the basket, I invite the children to say with me, "Thank You Jesus for my family!"  "Thank You Jesus for my house!", and so on. 

craft


This is a fun craft, with minimal prep, to cultivate a spirit of gratitude in your littles!


You will need:
  • paper plates
  • scissors
  • stapler
  • hole punch
  • chenille stems
  • water colors
  • this print out
  • card stock
  • crayons
To prepare, cut and fold a paper plate for each child as illustrated here.  I have found that the baskets hold together better with staples rather than tape. Punch two holes at opposite ends of the basket.  Place the ends of a chenille stem through each hole, twisting the stem around itself to secure it.  Print this print out on card stock, and cut out a card for each child.

In class, provide water colors for the children to paint their own Basket of Blessing.  Give each child a Thank You God card to color (or paint) and place in their basket.  As they color, discuss the pictures and other things that they are thankful for.


bring it home


To teach and/or reinforce this lesson at home why not start a new Thanksgiving tradition?!  Give each of your little ones a basket, and help them fill it with things for which they are thankful.  Your children will quickly catch on to this concept and be able to fill their baskets themselves as they focus on the blessings in their life.  Of course you may offer suggestions, but it's also fun to see what they deem as important, and add to their own basket.  Encourage them to bring their Thanksgiving Baskets to dinner to share with family and friends to keep the spirit of Thanksgiving alive and well in your family.  If you do, snap a picture and tag me @faithsprouts on Instagram.  Happy Giving Thanks!

Saturday, August 6, 2016

Creation Day 2

Preschoolers love to explore, and discover the world around them.  As you explore Day Two of Creation with your class, lead them to the great love of our Creator, which reaches higher than the heavens, and beyond the depths of the sea.

Bible Truth: God created sky and water.
Bible Story: God put clouds in the sky; and gave us water to drink, clean and play.
Bible Study: Genesis 1:1,6-8

teach


You will need:
  • a Bible
  • small blue cloth
  • clear tote
  • water
Prepare for the lesson by filling a clear tote to the desired level with water.  Cover the tote with the blue cloth.  Set it out in sight of the children, to spark their curiosity in your lesson.  Begin teaching with your Bible open to introduce the memory verse.

SAY: We are learning the very first words that are written in the Bible.  They tell us how God created the whole world.  Repeat after me.  Genesis 1:1 In the beginning, God created the heavens and the earth.  

On day number one (show me one finger),  God spoke, "Let there be light!" and there was light.  There was day and night on the first day of Creation.  God looked at the light, and said, "It is good!"

On day two (show me two fingers), God spoke, "Let there be sky up above the earth.  Reach up high.  And let there be water down below.  Make wave-like motions with your hands.  

Lift the small blue cloth from the tote, holding it over the heads of the children, out of their reach.  God put the beautiful blue sky way up high above the earth.  Can you reach the sky?  No, I can't either!  Thank You God for creating the sky!  

Lightly splash the water in the tote.  God also put big oceans, and seas of water on the earth.  God gave us water to drink when we are thirsty.  He gave us water so that we can take a bath, and wash ourselves clean.  We can also go swimming and play with water!  Thank You God for creating water!


play


shaving cream rain clouds


This is a cool visual to introduce your class to a simplified version of the water cycle.  Preschoolers can begin to understand how clouds fill up with water, and rain down on the earth.  Their reactions of wonder and amazement are precisely the way we want them to view the world around them, as well as the Creator of it all!


sink or float


Fill a clear tote with water, and set it next to you in front of the class.  Gather together several small toys, and/or objects of various densities.  Some examples include, a Lego brick, a coin, a small rock, a feather, etc.  Give each child an object to hold.  Invite one child at a time to bring their object up to the tote to predict whether their object will sink of float.  Then allow them to test their prediction!


sing


craft


You will need:
To prepare, print out this page, and pick out all the different shades of blue crayons that you have.

In class, provide blue crayons for the children to color the large number two.  When they finish coloring, help them glue cotton balls, as clouds, onto their number two.


Saturday, June 4, 2016

OT Hero: Samuel

Through the story of Samuel, we learn that God seeks an obedient, reverent and ready heart to whom He can speak and trust with His word.  Samuel shows children that as they learn to listen, obey and respect their parents, and their teachers, they also learn to hear and obey God.

Bible Truth: Samuel listened to God's voice.
Bible Story:  When God called Samuel's name, Samuel learned to                        say, "Speak Lord, Your servant is listening".
Bible Study: 1 Samuel 1:1-3:19

teach


Along with pictures from a Bible Storybook,  I include these visuals and actions to draw my students into the lesson of Samuel.

Cradle and hold a baby doll as Samuel, Hannah's answer to prayer.


I gathered up a couple gold items from around my house to describe the ways that Samuel learned to help and serve in the tabernacle.  You could use a fancy looking bowl, cup, vase, candle holder, or anything else you may have.  The idea is to show the children that Samuel learned how to take great care of the things that were used to worship God.  We know for sure that Samuel opened the doors of the tabernacle every morning.  He listened to Eli's instructions, and obeyed everything that Eli told him to do.


Then, I invite the children to role play the part of Samuel, while play the part of Eli.  They lay down and pretend to sleep.  I say, "Samuel! Samuel!"  They stand up and run (in place) and then repeat after me, "Here I am.  Did you call me."  I tell them to go back and lay down, and call for Samuel twice more.  On the fourth time, I teach the kids to say, "Speak Lord, Your servant is listening."

sing


Sing "Are You Sleeping (Samuel)?" with the actions as fun way to reinforce this lesson.

play


samuel scripture pass


Choose one of the objects that you used to represent items that were used for worship in the tabernacle that you don't mind the children handling.  Gather the children into a circle.  Remind them that Samuel learned how to take great care of the things in the tabernacle.  Explain that in this game, they are going to be very respectful with the item you have chosen, just as Samuel was.  Play a children's worship song as you pass the item around the circle.  Randomly stop the music.  Invite the child who is holding the item when the music stops to stand up.  Ask, "What did Samuel say when God called his name?"  Help the child repeat Samuel's response from 1 Samuel 3:10, "Speak LORD, Your servant is listening."  Continue playing the game, ensuring that each child has a turn to repeat the verse.

craft


sleeping samuel, sitting samuel


Lay Samuel down in bed, and sit him when he hears the LORD call his name.  For this craft you will need:

  • this print out
  • card stock
  • felt
  • scissors (paper & fabric)
  • glue
  • crayons
To prepare, print page one onto regular paper, and page two onto card stock.  Cut out the Samuel figures. For each child, cut one piece of felt to approximately 2.5" x 5".  Cut another piece of felt to approximately 2.5" x 3.5".

In class provide crayons for the children to color Samuel and the tabernacle scene.  Help them apply glue to attach the larger piece of felt to the activity page, and then apply glue to three sides of the smaller felt to create a "pocket" for Samuel.  


Fold the Samuel figures at the waist.  Put him into the felt "pocket" to lay down in bed, and then pull him out just enough to sit up and say, "Speak Lord, Your servant is listening."


Tuesday, May 24, 2016

OT Hero: Joshua

Our children are growing up in a world that blatantly erects walls in opposition to God and His Word.  Pray that the children you teach will come to know their God, as Joshua did, so that they may walk in confident obedience, regardless of the evil that surrounds them. Here are some great activities to help them begin to understand that our obedience, teamed up with God's power, is the key to victory.


Bible Truth: Joshua had courage to obey God.
Bible Story:  Joshua obeyed God, and marched around Jericho.  God gave Joshua the victory!
Bible Study: Joshua 6

teach


dramatic play


I like teaching little ones the story of Joshua and the battle of Jericho through dramatic play!  I have this set of cardboard blocks that I picked a couple years ago to use as our walls of Jericho. Before that, I use to save ALL my shoe boxes, specifically for this lesson, and they worked great!  I like to set the blocks up on a low table, with a table cloth under them. 


I also gather up the little people from our nativity set.  The children can each hold one as they participate in the story, making the people march, sleep and shout.  Using little figurines such as Lego people, army men, or anything else you may have, gives the children a perspective of the size of the wall around the city of Jericho.  It also gives them a greater appreciation for the incredible miracle God did when He brought the walls down.


This sun and moon visual help mark the days and nights, as we dramatize the story.


I read the story from a children's storybook Bible, or read selected verses straight from my Bible, pausing to direct the kids, as we act out each part of the story.  We march around the city walls once, without a sound, then go lay down to sleep, and repeat the process five more times, just as the Israelite's did. This activity not only burns off some energy, it also helps them to understand that Joshua won the battle because he obeyed, and did exactly what God told him to do, even though other people laughed at him, and made fun of him.  

Of course, on the seventh time that we wake up, we march around the city seven times, blow our "trumpets" and give a shout!  I pull the cloth to make the walls fall down!  This makes the point to the kids that Joshua's army didn't make walls fall down.  God is bigger and stronger than any walls, or any army, and He made walls fall flat down.  Thank You God for giving us the victory!!


sing


  • Bigger Than Big - This is a great song to sing during worship time to support the lesson.
  • My God is So Big - This is also a great song to sing during worship time to support the lesson.
  • They Marched Around the City - This is a fun, playful song, set to a classic children's nursery rhyme, to reinforce the lesson, or to do at any time, when you need a little filler.
  • Joshua Fought the Battle of Jericho - This song works best as a puppet song or as a song to listen to during craft time.

play


they marched around the city


Setup the blocks, or boxes, as the walls of Jericho on a table cloth or sheet.  Sing "They Marched Around the City", as you march around the walls.  At the end, pull the cloth or sheet to knock the walls down.  The kids are sure to ask you to play it again and again!


craft


victory trumpets


Here is my version of a simple trumpet craft that makes the dramatic play suggestions even more fun!
You will need:
  • scripture labels
  • cardboard tubes (toilet paper or paper towel rolls)
  • construction paper
  • wax paper
  • rubber bands
  • hot glue gun
  • scissors
  • tape
  • crayons
To prepare, print and cut the scripture labels.  Cut construction paper sheets into fourths, and cut wax paper into approximately 3.5" by 3.5" squares.


In class, give the children the scripture labels to color.  Tape the scripture to the construction paper as shown above. and then tape the construction paper around the cardboard tube.  Place the wax paper over the shown end of the tube, and secure with a rubber band.  Apply a couple dots of hot glue to keep the rubber band in place.  DO NOT ALLOW CHILDREN TO HANDLE THE HOT GLUE GUN, AND KEEP IT OUT OF THEIR REACH.


Make a "doo-do-it-dooo" noise into the open end of the trumpet for a great kazoo sound!


the walls fall down


This craft gives the children the opportunity to retell the story, and bring home the words to "They Marched Around the City" to sing at home with their parents.  You will need:
  • this print out
  • construction paper
  • yarn
  • drinking straws
  • brown paint
  • sponges
  • scissors
  • hole punch
  • glue
  • tape
  • crayons
To prepare, print and cut the print out. Cut the solid lines around the wall.  Fold the wall along the dotted lines. Cut out the character graphics and the rhyme, on the dotted lines.  Punch two holes on opposite ends of the construction paper.  Cut drinking straws to about 3" in length, and cut yarn to approximately 24" lengths.  Thread a strand of yarn through the cut straw, and then through the holes of the paper.  Tie it securely in the back.  Cut sponges into rectangular, brick shapes.


In class, provide small rectangular sponges and brown paint for the children to stamp brown bricks onto the wall. Allow the walls to dry for a few minutes while you continue working on the craft.  Provide crayons for them to color Joshua and the Israelite's.  Tape the characters to the straw.  Glue the lyrics to the rhyme onto the construction paper.

When the walls are mostly dry, tape the bottom tabs to construction paper as shown below.  


Show children how to manipulate the people to march, and make the walls to fall, as you sing the rhyme.


Tuesday, May 17, 2016

OT Hero: Joseph

Children can absolutely glean lessons from Joseph's story about keeping a good attitude when they are treated unfairly, and forgiving those who don't deserve it, but the ultimate goal of every Biblical account of someone's life is to teach us something of God, and His character.  Through the twists and turns of Joseph's life, we see God's goodness, God's faithfulness, and His ability to work all things out for our good (Romans 8:28).  As you teach the story of Joseph, point your children towards God and His goodness.  Here are some ways to help you do just that!


Bible Truth: Joseph shared God's goodness.
Bible Story:  Joseph's brothers were mean to him, but God was good to him.  Joseph forgave his brothers and helped his family.
Bible Study: Genesis 37-45


teach


show-and-tell


As with most Bible stories, I will use a Children's Bible Storybook, or flannel graph for visuals, but I always try to add another tangible element to bring the story alive!  There are a lot of details in the story of Joseph, but since we are teaching this lesson to young children in one service, I focus on the big picture of Joseph's life, emphasizing that God was watching over Joseph wherever he went.  No matter where Joseph was, or how he felt, he trusted and obeyed God.  These items help me stay on track, and illustrate each of these points in the story.


  • colorful scarf / cloth - Joseph had eleven brothers.  Can you count to eleven?  Joseph was his father's favorite son. His father, Jacob, gave him a very special, beautiful, colorful coat.  This made Joseph's brothers jealous, because they didn't get a special coat.  Joseph also had special dreams like that the sun, moon and eleven stars bowed down to Joseph.  The dreams seemed to mean that Joseph's father, mother and eleven brothers would bow down to him.  Dreams like this made Joseph's brothers mad at him.
  •  rope - One day Joseph's brothers stole his coat and threw him into a pit, a dark hole in the ground.  They were trying decide what to do with him, when some travelers who sold expensive spices and oils passed by.  They sold Joseph to the travelers, so that they could sell Joseph as a slave.  How do you think Joseph felt when his brothers treated him this way?
  • hand towel and money - The travelers sold Joseph to the captain of the army in Egypt.  Joseph took very good care of the captain's house.  God was with Joseph, and He became the one in charge of everything in the captain' house, even all of his money.  How do you think Joseph felt now?
  • handcuffs - One day, the captain's wife told a lie about Joseph.  She told her husband that Joseph tried to hurt her.  The captain believed his wife's lie and threw Joseph into prison.  How do you think Joseph felt in prison?  Even in prison, God was with Joseph, and he became the one in charge of all the prisoners.  Sometimes the prisoners had strange dreams, and God helped Joseph explain the meaning of their dreams.
  • Egyptian headdress (Follow the link for a template.  This could also be a craft for the kids to make!) - One day, Pharaoh, the king of Egypt, had a strange dream.  He called Joseph out of prison, and God helped Joseph explain the meaning of Pharaoh's dream.  Pharaoh listened to Joseph and made him ruler over the land of Egypt.  How do you think Joseph felt now?  
  • bag of rice, oats or any other grain - After seven years there was a terrible famine.  There was no food in all the land, and people were very hungry.  But as the ruler of Egypt, Joseph had stored up lots of grain, so people all over the land came to Joseph to get grain to eat.  One day, Joseph's brothers came to Egypt to ask for grain.  They came before Joseph and bowed down to him.  Joseph recognized them, but they didn't know that it was Joseph.  Joseph's dream came true!  His brothers were bowing down to him!  Joseph had lots of power.  He could throw them into prison, or even kill them, if he wanted to get back at them for the horrible way that they treated him.  But Joseph didn't do that.  He started to cry, and said to them, "Brothers, it's me Joseph.  You tried to hurt me, but God was taking care of me.  He brought me here, and made me the ruler so that I can help you.  I forgive you for the way that you treated me."  He hugged them, gave them all the food that they needed.  Then all of Joseph's family came to live with him Egypt.  How do you think Joseph felt now?
  • binoculars - God was watching Joseph everywhere that he went.  He saw Joseph proudly wear his colorful, handsome coat.  He saw Joseph when his brothers stole his coat, threw him in a pit, and sold him as a slave.  He saw Joseph take good care of the captain's house, and he saw him get thrown into prison when he didn't deserve it.  He saw him become the ruler of Egypt, and forgive his brothers.  God was always watching Joseph.  Joseph kept a happy heart, and kept believing and trusting God.  God took care of Joseph.  He made the bad things in his life turn out to be good things.  God is always watching and taking care of you too!

sing


  • Watching Over You - God was watching over Joseph everywhere that he went, and God is watching over you too!  Here is a video to see suggested actions for this song.
     
  • When I'm Sad - God was with Joseph when he felt sad, hurt, scared and mad.  Joseph believed that God was with him, and knew that God was helping him.  
Here's a great visual to go with this song!  If you have ever attended one of my seminars, you've likely seen me do this song.  I suggest printing on card stock for durability.  Print page three on the back of page one.  Print page four on the back of page two.  Then cut each page lengthwise, fold and attach each pair of faces to a file folder as shown below.  Add a small bandage to the hurt red face.  Lift each flap as you sing each part of the song.  


I'm telling you, this song is anointed!  The kids loooove it, and it has a very applicable message for their lives.


play


i spy


Play the classic game of "I Spy" with your class to imagine all the beautiful colors that were on Joseph's coat!  Use your binoculars to spy an object in the room.  Say, "I spy with my little eye something that is ___________ (color of object)".  Give the children three guesses to find your object.  Let the children take turns to spy objects too.

craft


coat of many colors


You will need:
To prepare, print the activity page, and use wire cutters to cut chenille stems the length of Joseph's coat.

In class, provide crayons for the children to color.  Help the children apply glue, and choose chenille stems to press onto Joseph's coat.


God is watching binoculars


If you use binoculars, as suggested to wrap up the story, your kids will want to look through the binoculars as well.  They will love having their own pair to take home that will help them remember both the story of Joseph, and that God is always watching over them!  You will need:
To prepare, print and cut the binocular cover print out.  Place two cardboard tubes side by side, and wrap colored tape around the top and the bottom to connect them, and give them a finished look.  Cut yarn, or lacing, to approximately thirty inch lengths.


In class, provide crayons for the children to color their binocular covers.  Use clear tape to secure the covers around each pair of cardboard rolls.  Punch a hole on either side of the binoculars.  Tie yarn or lacing through each hole to complete the binoculars.


Friday, May 6, 2016

Happy Mother's Day

Mother's Day is a special and different type of day in my classroom.  We keep the generally same routine, but we make Mom the star of the show, and focus on things that will be a blessing to her!

Bible Truth: Thank God for my mommy.
Bible Story:  God's Word says to obey and bring joy to my mother.
Bible Study: Proverbs 23:25; Ephesians 6:1-3


pray


When it comes to prayer time, we forego the normal prayer requests.  We talk about all the things our mothers do for us, and how blessed we are because God gave us a mommy to take care of us.  We thank God for her, and pray especially for her.  Praying for our mommies is one of the best ways that we can show our love for her!

craft


Today's goal is to be a blessing to our mothers, so instead of a lesson, we put our love into action, allowing for a longer craft time to make something extra special for her!  Since most children are in my class for two years, I try to never repeat the same Mother's Day craft two years in a row.  Thankfully, Pinterest helps to keep the creative juices flowing!  I've rounded up a few different craft ideas from other sites to share with you.

Butterfly Handprint Card - You will probably need to trace all the kiddos' handprints right at the beginning of service to get them all cut out and ready to assemble and decorate, but I think these are quite adorable!


Because Bouquet - For younger children, you will need to write the reason that they love their mom for them, but the reasons that little ones give are always so cute, and they make a great keepsake for Mom!


Satin Hands Sugar Scrub - This was the Mother's Day gift that I made with my class last year.  I used small plastic containers, which also come in a pack of ten at Dollar Tree.  Children mixed their ingredients in a cup.  I poured the mixture into the container, and they chose a pretty flower decal to attach to the lid.  We labelled them with these labels (which will fit on an Avery 5160 address label if you would like to print them onto an adhesive label).  It was a sweet, and useful gift that the kids really enjoyed making, since it was different than the crafts that we usually do.

Mary Kay's Satin Hands Copycat Recipe